Another cupholder bites the dust

Maybe it is because I am English-born, but I don’t need to drink & drive – the huge cupholder in the ’05 MINIs is just too big, and I had it removed from GBMINI#3 double quick!


(I sold it so maybe it now has a good home in another MINI!)

I use one little (front) cupholder to carry my cellphone, and the central rear cupholder transfers my morning coffee about 1/4 mile from the store to the office – no drinking in GBMINI!

Today Marie Catherines MINI Cooper Convertible took a trip to MINI Peabody – the ring around the speedometer should have been chrome but was manufactured wrong in silver, so today it was replaced. Also, a worrying loose piece of roof turned out to be part of the shipping protection left over, and was easily removed! Gary explained that this is done at VDC and they had never seen the part before – trust me to find the unusual MINIs!
Marie Catherine also had the cupholder removed from her MINI – another European perspective results in another unwanted giant cupholder!

(just noticed there is a “no glasses” symbol on the cupholder – is that something people would do if they weren’t told not to?!)

Google!

Back in the mists of ancient internet (around 1996-7) I was a devout AltaVista user but some time (!) between then and now I switched to Google (amazed just now to discover that AltaVista still exists – seems to be part of Yahoo now)
Google seems to almost always give relevant search results, and with its image searching and the new customisable news page, it is my home page too.

Earlier this year, having read about Google AdSense, I decided to experiment with it on GBMINI (you might have noticed).
So now that Google has had a little box here for nearly three months, what have I discovered?
Firstly, it is interesting to see when Google discovers “a topic it likes” on my web pages, and generates what might be useful ad links. My recent alarm install for example, or a much older article about rear fog lights.
It gives some insight into the technology behind Google – because all those web pages had to be indexed and “understood” in order to give “relevant” ad links.
On the other hand, there are an awful lot of generic “MINI” ads (presumably because I did not write anything “interesting”!)

If you are wondering about making your fortune with Google AdSense, you will need a much more popular web site than mine … GBMINI has raised a grand total of $10.55 in three months (maybe Gabe Bridger does better on MotoringFile)! Since Google does not pay out below $100, I won’t be looking for a check any time soon 😉

Inside the toggle switch panel

[A very strange “how-to” … non-MINI-fanatics may wish to skip this!]

For various reasons, I have disassembled more than one MINI toggle switch panel and I know that although there are two LEDs (lights) that shine down below the panel, there is a position for a third one on the circuitry and even a hole in the case.
So before installing my new stereo & the chrome toggle switch panel, I decided to add a third LED to the panel. I also increased the brightness of all three LEDs …

I have taken lots of pictures showing how to disassemble the toggle switch panel and modify the circuit – but you have to be OK with soldering surface mount parts.


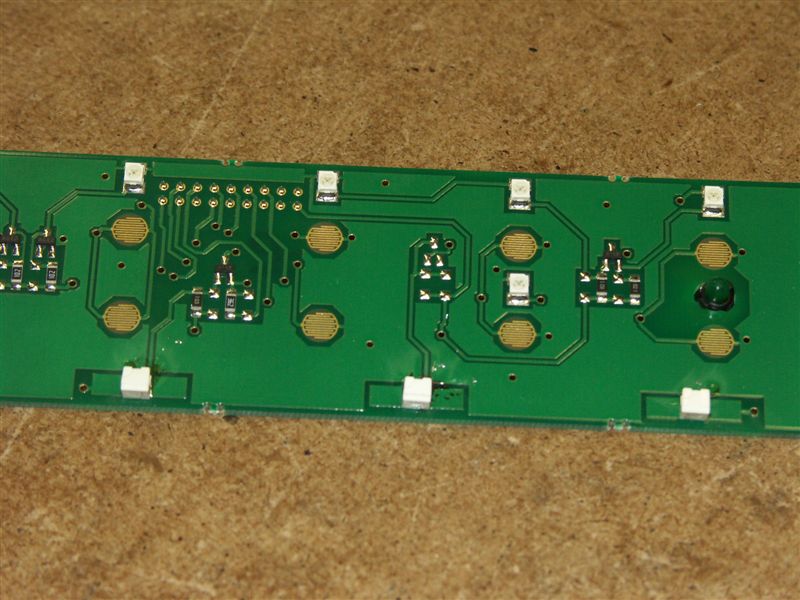
In this picture you can see (left & right) two white squares – these are the original LEDs; in the top middle are two silver contact areas where the third LED can be fitted. Dead center of the picture are more silver contacts, where a necessary current limit resisor must be soldered to supply the new LED. Also visible are the circular gold areas are where the membrane switch conductors press when you close a toggle – you can see interwoven fingers from two sides, which are connected together when the switch is closed.

The toggle switches are an assembly of parts – the actual chrome toggle clips into the front of the toggle switch panel with two bumps that give it a hinge; it presses against two plastic “push pieces” which look a bit like springs. When the toggle is levered up or down, one of the plastic pieces is pushed down and presses onto an “elastomeric” membrane. At the pushed point there is a conductive piece on the other side, which is in turn pushed down on to the gold fingers of the circuit shown above.
The elastomeric is rubbery and springs back when the toggle is released, so returning the toggle to center and releasing the connection on the gold fingers.

The resulting toggle switch panel is an elegant way to provide a lot of switches in a low cost package (at least when assembled in MINI quantities) – but the switches are limited to very low current (no direct turning on/off of anything), and their wiring is fixed by the design of the circuit (so you can’t use them for anything else).