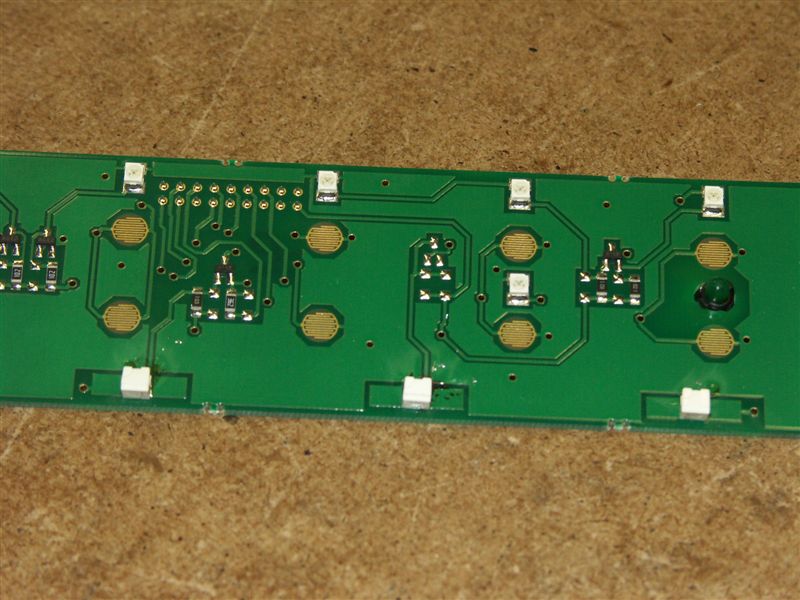
Inside the toggle switch panel

[A very strange “how-to” … non-MINI-fanatics may wish to skip this!]

For various reasons, I have disassembled more than one MINI toggle switch panel and I know that although there are two LEDs (lights) that shine down below the panel, there is a position for a third one on the circuitry and even a hole in the case.
So before installing my new stereo & the chrome toggle switch panel, I decided to add a third LED to the panel. I also increased the brightness of all three LEDs …

I have taken lots of pictures showing how to disassemble the toggle switch panel and modify the circuit – but you have to be OK with soldering surface mount parts.


In this picture you can see (left & right) two white squares – these are the original LEDs; in the top middle are two silver contact areas where the third LED can be fitted. Dead center of the picture are more silver contacts, where a necessary current limit resisor must be soldered to supply the new LED. Also visible are the circular gold areas are where the membrane switch conductors press when you close a toggle – you can see interwoven fingers from two sides, which are connected together when the switch is closed.

The toggle switches are an assembly of parts – the actual chrome toggle clips into the front of the toggle switch panel with two bumps that give it a hinge; it presses against two plastic “push pieces” which look a bit like springs. When the toggle is levered up or down, one of the plastic pieces is pushed down and presses onto an “elastomeric” membrane. At the pushed point there is a conductive piece on the other side, which is in turn pushed down on to the gold fingers of the circuit shown above.
The elastomeric is rubbery and springs back when the toggle is released, so returning the toggle to center and releasing the connection on the gold fingers.

The resulting toggle switch panel is an elegant way to provide a lot of switches in a low cost package (at least when assembled in MINI quantities) – but the switches are limited to very low current (no direct turning on/off of anything), and their wiring is fixed by the design of the circuit (so you can’t use them for anything else).

An Alarming Day

I dropped by MINI Peabody and met Charlie, collecting his brand new convertible (in perfect colors) – doesn’t he look like the perfect happy MINI owner?!

Scott told me that the parts for GBMINI#3 factory alarm arrived, so I thought “great, a quick install so let’s do it” …

Things went less-than-smoothly with the alarm install, due in large part to the “S” painting; Sublime Restorations had had to remove the headliner to do the work, and when they refitted it, the wiring harness to the alarm sensor in the roof got “lost”.
The alarm is supposed to be easy to install – remove the roof piece and connect the sensor to the wire. It is not supposed to take the best part of an hour and partial headliner removal to find that wire!

Anyway, much kudos to Todd who persevered and never swore, and finally got all the parts installed … only to find that the system would not work when it was configured!
I am still not sure why the factory alarm did not initially work; maybe you have to switch the car off and on again after configuring, or maybe (as Bob said) there is some key/ignition trick that can disable the alarm and we did it accidentally … Whatever the reason, the alarm was not working initially, then it started working, then it stopped again, then it started again.

It is nice to have the extra comfort of the alarm again, and I like the “chirp” … “chirp chirp” audio feedback of locking & unlocking the car.
I don’t think the $400 cost is excessive either (note that the alarm pricing has been re-structured so that you now buy the base system for $195 then a separate switch with LED indicator for $100 – because the switch type depends what MINI and specifications you have).

By chance my low-washer-fluid light was flashing today too, so I got an “old” right (wipers) stalk and confirmed the red light indicates low-washer-fluid (ie: it is the same wiring, just a different color light).
So I had that installed too – because I really don’t like the yellow light spoiling the interior red/black looks 😉

Gabe Bridgers ’05 MINI

Very interesting to see how different people order their ’05 MINI when they upgrade from an older model …
Gabe Bridger, who runs MotoringFile, just put in his order and it is very different from GBMINI#3!
Gabe has gone for minimal interior gadgetry, while I bought nearly everything I could; he is also getting 18″ wheels (!) even though Chicago potholes are likely almost as bad as Boston ones – I guess he just likes the challenge of steering round them 😉
Interesting too is Gabes comment that he ordered the sunroof for extra height (“Being tall it’s also nice to have a little more room up there”), while I did not order it for the exact same reason.

Congratulations Gabe – really looking forward to pics when it arrives.