[A very strange “how-to” … non-MINI-fanatics may wish to skip this!]
For various reasons, I have disassembled more than one MINI toggle switch panel and I know that although there are two LEDs (lights) that shine down below the panel, there is a position for a third one on the circuitry and even a hole in the case.
So before installing my new stereo & the chrome toggle switch panel, I decided to add a third LED to the panel. I also increased the brightness of all three LEDs …
I have taken lots of pictures showing how to disassemble the toggle switch panel and modify the circuit – but you have to be OK with soldering surface mount parts.


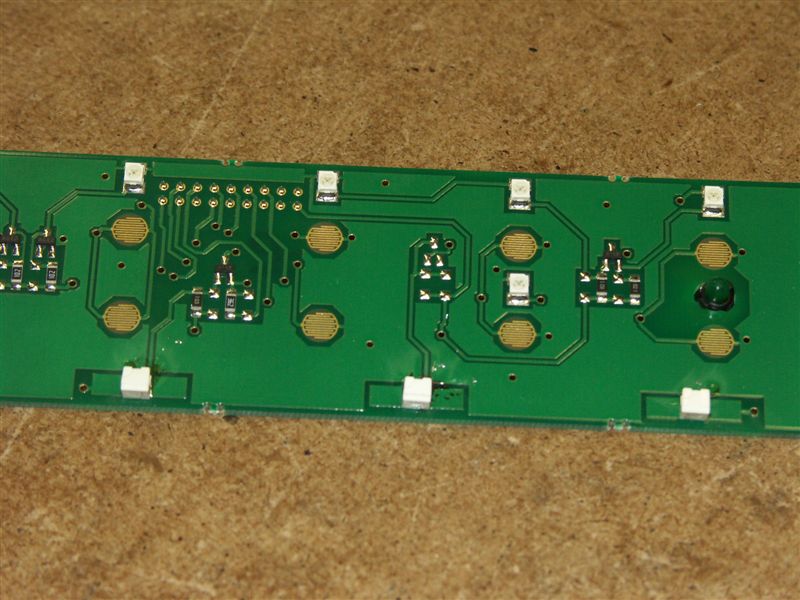
In this picture you can see (left & right) two white squares – these are the original LEDs; in the top middle are two silver contact areas where the third LED can be fitted. Dead center of the picture are more silver contacts, where a necessary current limit resisor must be soldered to supply the new LED. Also visible are the circular gold areas are where the membrane switch conductors press when you close a toggle – you can see interwoven fingers from two sides, which are connected together when the switch is closed.
The toggle switches are an assembly of parts – the actual chrome toggle clips into the front of the toggle switch panel with two bumps that give it a hinge; it presses against two plastic “push pieces” which look a bit like springs. When the toggle is levered up or down, one of the plastic pieces is pushed down and presses onto an “elastomeric” membrane. At the pushed point there is a conductive piece on the other side, which is in turn pushed down on to the gold fingers of the circuit shown above.
The elastomeric is rubbery and springs back when the toggle is released, so returning the toggle to center and releasing the connection on the gold fingers.
The resulting toggle switch panel is an elegant way to provide a lot of switches in a low cost package (at least when assembled in MINI quantities) – but the switches are limited to very low current (no direct turning on/off of anything), and their wiring is fixed by the design of the circuit (so you can’t use them for anything else).

Okay, two things.
One, you are a freak. :o)
This is the highest of compliments as I am so jealous. I have no engineering acumen, whatsoever. This irks me as there are often things I would love to “tinker” with, but I know I never could pull off. We have a friend that is a mechanical engineer and on a Saturday, on a whim, he decided to relocate his hot water heater and furnace to another area of his basement simply because it bugged him that it was not in a better utilized space. More imprortantly, he did it because he could! He didn’t even have to go to the store to buy parts, tools or anything. He had everything he needed and knew what do to without having to use any reference books, materials, etc.
I am and will forever be jealous of engineers. The only solace I have is that I can at least finance (by way of my boring banking life) the engineering companies that come up with wicked cool gadgets. :o)
Second thing… Any pics of the toggles put back in GB so we can see it lit up at night? Perhaps a before and after to see how much of a difference the “waterfall” has?
Have a good one.
Sorry, no before/after pics …
Hmmm …
Goes to look in moving boxes for an old toggle panel..! 😉
Thanks for posting this.
Clint Eastwood’s “Dirty Harry” said “a man’s got to know his limitations.” I’m afraid this might be beyond my limitations.
Can you point me to a link where you discuss the chrome rings on the switch panel?
You can read about the chromed toggle switch panel here – I bought it from someone on MINI2 and I don’t know how to get another one done …